
DF-M25843-tasknum1 not displaying all 10 characters
Symptom
tasknum1 field not displaying all 10 characters
Product Line
DF-M25773-SPS-The sustainer payment is not selected when a payment has been processed and the process month and day is greater than the due month and day unless a range of due dates is used
Symptom
The sustainer payment is not selected when a payment has been processed and the process month and day is greater than the due month and day unless a range of due dates is used
Product Line
DF-M25735-Deactivate remaining sustainer payment schedule does not reduce the linked pledge count
Symptom
Deactivate remaining sustainer payment schedule does not reduce the linked pledge count
Product Line
24791-DF-M25718-Data Examiner>Billable
Symptom
Unable to use ADE to import Sustainer Pledges with the Billable checkbox unchecked
Product Line
DF-M25445-Incorrect syntax near ‘s’ error when importing event records using ADE Import tool where the event name contains an apostrophe
Symptom
"Incorrect syntax near ‘s’" error when importing event records using ADE Import tool where the event name contains an apostrophe

Product Line
DF-M25373- Information about Recent Reports does not display in Favorites>Recent Reports>Edit Reports nor Run Reports
Symptom
Information about Recent Reports does not display in Favorites>Recent Reports>Edit Report nor Run Reports

Steps to Reproduce:
- Click on Favorites in the Millennium navigator
- Click on Recent Reports>Run Report or Edit Report
- Click on the i on any of the listed reports to obtain last run and last edited information
- Notice no information is displayed as it normally does in Millennium reporting
Expected result: I would expect the report last run and last edited and user information when I click on the I beside each report.

Related Information: Help Information
Run
Access your recently run reports by using Favorites>Recen tReports>Published.
Report criteria can be run by using Millennium Explorer, Reporting>Run Criteria. Your recently run reports can also be re-run from Favorites. For each reporting category (library), a list of the last ten reports that have been run for your user name (whether you ran them, or they were run on your behalf) is displayed.
For each report listed, the report name displays as a hyperlink. The report description, if one exists, will also display.
Pass your mouse pointer over the chosen report's information icon to view the date that the report was last run, and other statistics about the last run.
To re-run a report, click the report name hyperlink, the Report Run Options page will display. Set the options as you prefer and then launch the report.
Edited
Access your recently edited reports by using Favorites>Recent Reports>Edited.
Report criteria can be edited by using Millennium Explorer, Reporting>Edit Criteria. Criteria that you have recently edited can also be accessed from Favorites. For each reporting category(library), a list of the last ten reports that you have accessed for editing purposes and then saved is displayed.
For each report listed, the report name displays as a hyperlink. The report description, if one exists, will also display.
Pass your mouse pointer over the chosen report's information icon to view the date that the report was last edited, and statistics about the report's last run (if any).
To access report criteria for editing purposes, click the chosen report's name hyperlink or select Display from the chosen report's edit button pop-up menu. The Report Form page will display. Edit the criteria as you want and re-save. Close the Report Form, or run the criteria, as you prefer.
To delete the report criteria, select Delete from the edit button pop-up context menu.
Product Line
DF-M25242- Brackets in memory names lookup table value cause the Create Summaries utility error
Symptom
Special characters in memory names value field cause the Create Summaries utility to result in a Utility Error or Windows C0000005 error.
Steps to Reproduce:
Steps to Reproduce:
- Click on Tools>Profile Lookups
- Click on Memory Names
- Click Insert
- In the Value field enter F18) Open pledges to AF18
- Add a value for the Code field
- In Groups enter $ and ensure the code is Active and click Insert
- Insert a second memory name by clicking Insert
- Enter the Value as F19) Open pledges to AF19
- Repeat steps 5 & 6 above
- Insert a third memory name, entering F) Open pledges to Annual Fund in the Value field
- Repeat steps 5 & 6 above
- Log into the IIS machine
- Browse to inetpub\wwwroot\mill\tools
- Locate the Assign Summary Definition utility and right click to run as Administrator
- Select Machine Data Source tab and highlight WebSQL and click OK
- Enter the login ID as ‘sa’ account and enter the appropriate password and click OK
- Click File>New Definition
- In the Define Numeric Memories window choose the first value added in step 4 above - F18) Open pledges to AF18
- Highlight the value F18) Open pledges to AF18 and click Total 1, then click Add
- In the same Define Numeric Memories window choose the second value added in step 8 above - F19) Open pledges to AF19
- Highlight the value F19) Open pledges to AF19 and click Total 2, then click Add
- Next select the third value by highlighting in the Define Numeric Memories window, the F) Open pledges to Annual Fund and click Total 3, then click Add
- The screen memory names linked to the totals should look like below
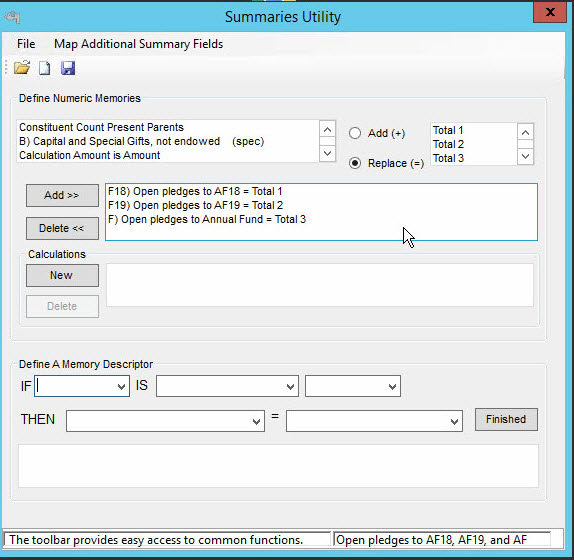
- Click File>Save As and enter the following name for the summary definition“Open pledges to AF18, AF19, and AF” and click OK to save
- .

- Close the Summaries utility
26. Log into Millennium and go to Reporting
27. Click New Criteria>Financial
28. Choose Total Giving Abila1 report which uses summaries
29. Click Save As and save the report under a new name
30. Click on Criteria
31. Enter the following criteriaSelect all basic Data where Id from Basic Data is greater than ‘0’
And where the Id from the Basic Data is in the list of:
‘<a prompted reply>’
TOTAL 1 – Sum: Open AF18 (on the Total 1 page enter Open AF18, include Match Due, Calculation Amount of ‘Amount’, Calculation Type of ‘Sum’ and Include all Credits and Save)
Total all Giving Detail where Account # from Giving Detail is in the list of:
‘1’
‘2’
‘3’
‘4’
‘5’
‘6’
‘7’
and where the Campaign Year year from Giving Detail is equal to ‘2018’
and where the Type from Giving Detail is in the list of:
‘Pledge Credit Transaction’
‘Pledge Transaction’
Include match due
TOTAL 2 – Sum: Open AF19 (on the Total 2 page enter Open AF19, include Match Due, Calculation Amount of ‘Amount’, Calculation Type of ‘Sum’ and Include all Credits and Save)
Total all Giving Detail where Account # from Giving Detail is in the list of:
‘200’
‘202’
and where the Campaign Year from Giving Detail is iequal to ‘2019’
and where the Type from Giving Detail is in the list of:
‘Pledge Credit Transaction’
‘Pledge Transaction’
include match due
TOTAL 3 – Sum: Sum Open Pledges to Any Annual Fund (on the Total 3 page enter Sum Open Pledges to Any Annual Fund, include Match Due, Calculation Amount of ‘Amount’, Calculation Type of ‘Sum’ and Include all Credits and Save)
Total all Giving Detail where Type from Giving Detail is in the list of:
‘Pledge Credit Transaction’
‘Pledge Transaction’
and where the Account # from Giving Detail is in the list of:
‘7’
‘250’
include match due - 32. Click Run
- 33. Click OK to save the report criteria table successfully
34. Click OK on the Run page
35. Click Not applicable to this report when it prompts for the list of Ids in the prompt and parameter options screen and click OK
36. Select the saved definition of Open Pledges to AF18, AF19, and AF in the Memory Definition dropdown list
37. Click OK to run
38. A message will display that the report has been successfully added to the queue
39. In the Millennium Navigator click Q Management, then click the queue link to select the queue to display
40. The queue status should display the utility working through the data selection, totals and once completed will display 100% complete if successful
41. In our case the queue displayed a message “Utility Error” insteadThe resulting CreateSummariesOut.log file in the Queue folder on the IIS will display the following - :

- The customer site had an APPCRASH error in windows resulting in c0000005 error as well as the exact error experienced inhouse above in the createsummariesout.log file.

Product Line